
中
Log in


HelpHelp
FeedbackFeedback
SecuritySecurity
AboutAbout
HelpHelp
FeedbackFeedback
SecuritySecurity
AboutAbout
 Menu
Menu
Latest blog updates
Blog > Article
Overview
Overview
Account Management
Account Management
Device Bind
Device Unbind
Invite Members
Security Password
Secure Mailbox
Device Management
Device Management
Device Indicator
Network Configuration
Document Management
Document Management
Document Rules
Document Recovery
Backup and Restore
Album Sync
Developer Options
Developer Options
Enable Developer Options
Switch Platform Environment
Image Installation
Binding Devices #
1. Install AO.space App
- Scan the QR code on the inside of the magnetic cover of the device or on the manual with your mobile phone, and follow the prompts to download and install the App.
- Apple mobile phones can also search and install "AO.space" in the App Store.
2. Device startup and networking
- Connect the standard power adapter of the device to the power interface of the device and turn on the power.
- You can choose to connect the network interface of the device to the LAN port of the router with a network cable for wired connection; the WiFi version of the device also supports wireless connection.
- Short press the power button of the device to boot successfully.
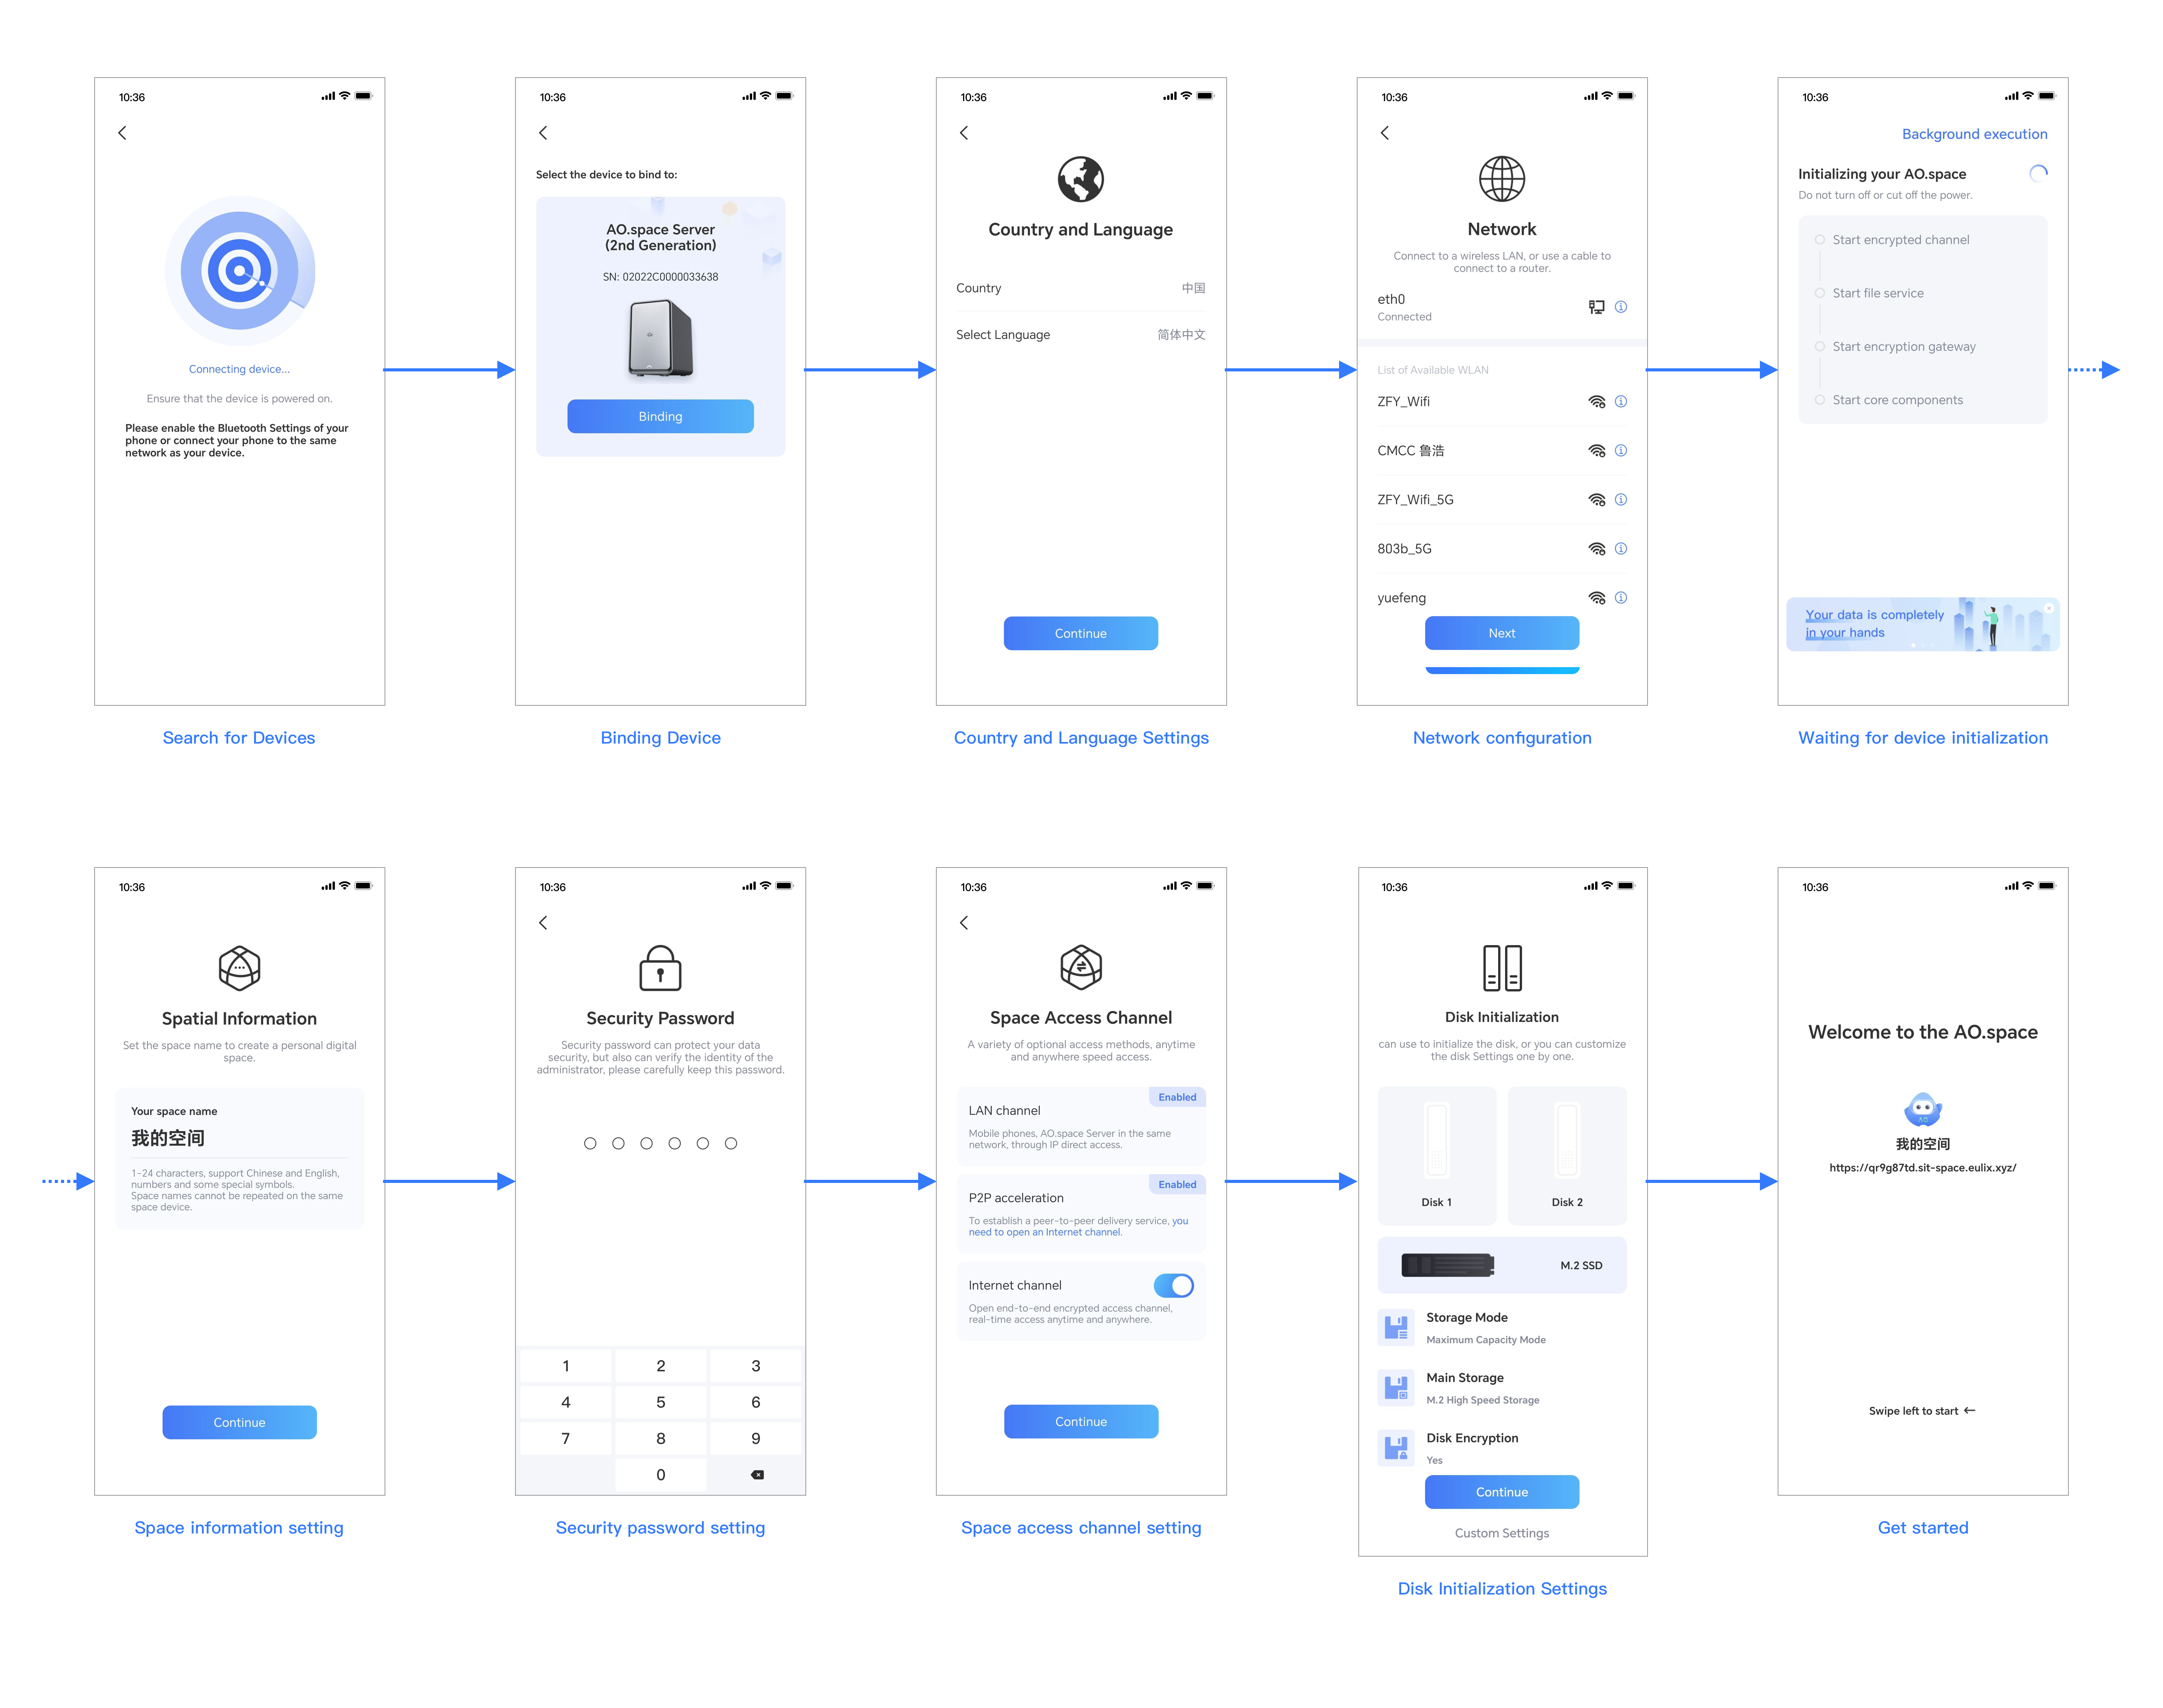
3. Initialize AO.space Open the [AO.space App], click [Binding Device], and follow the instructions in the app to complete the initialization of the Aospace device, account and service settings, and disk initialization. The specific steps to bind the device are as follows:
- Search for Devices: Scan the QR code inside the magnetic cover of the device using the AO.space App, and the AO.space App will start to search for the device, wait for a period of time to search for the device, select the AO.space device to be bound, and click [Binding].
- Country and Language Settings: The default country is China, the default language is Simplified Chinese, click [Continue].
- Network configuration: If you use a network cable connection, you can directly click "Next"; if you use a WiFi wireless connection, please select a WiFi network, enter the WiFi connection password, connect to the wireless network, and click [Continue].
- Waiting for device initialization: Start the encrypted channel, encrypted gateway, file service and other core components, and automatically enter the next step after completion.
- Space information setting: Enter the space name, define personal digital space information, and click [Continue] after setting.
- Security password setting: Set a six-digit security password, which will be used to protect the data security of the space and the identity verification of the space owner, please keep it safe. After the setting is completed, it will automatically enter the next step.
- Space access channel setting: LAN direct access is provided by default, and AO.space provides official Internet forwarding service for users to choose. Open the Internet access channel, and you will get your own personalized domain name. After the setting is complete, click [Continue].
- Disk Initialization Settings: AO.space provides a default configuration based on security disk initialization, and supports one-click start. At the same time, you can also customize settings according to your own preferences. During the disk initialization process, the system will format all the data on the disk, please make sure that important data has been backed up. After the initialization is complete, the system will display the currently effective storage configuration, and you can confirm it again. After confirming, click [Continue].
- Get started: At this point, you have completed all the operations of binding the device and successfully created your personal exclusive digital space. Swipe left to experience the products and services of AO.space.
Download
Trial ![]()
Open Source ![]()
Comparison ![]()
ChangeLog ![]()
Document
Getting Started ![]()
Development ![]()
Installation ![]()
API Documentation ![]()
Support
Help ![]()
Feedback ![]()
Security ![]()
About ![]()
Follow us
 service@ao.space GitHub
  Slack groups
  bilibili
 Contact us
WeChat

Download

Trial ![]()
Open Source ![]()
Comparison ![]()
ChangeLog ![]()
Document
Getting Started ![]()
Development ![]()
Installation ![]()
API Documentation ![]()
Support
Help ![]()
Feedback ![]()
Security ![]()
About ![]()
Follow us
WeChatCopyright © 2022-2023 Institute of Software Chinese Academy of Sciences
- Overview
- Account Management
- Device Bind
- Device Unbind
- Invite Members
- Security Password
- Secure Mailbox
- Device Management
- Device Indicator
- Network Configuration
- Document Management
- Document Rules
- Document Recovery
- Backup and Restore
- Album Sync
- Developer Options
- Enable Developer Options
- Switch Platform Environment
- Image Installation
Home
Document
Download
Blog
Support
Language Settings
 简体中文English